The project has a route, but the route is still dark. In this Adventure, you will give it a beginning: a full-screen splash, a timed move into the main menu, and two working choices that either enter the Boneyard or leave the game.
The artwork does not need to carry the logic. It is a visual layer laid beneath invisible, dependable controls. When the Adventure is complete, the player will travel from L_Boot to L_MainMenu and into L_Boneyard without touching the editor.
Before you begin, complete Adventure 1 — Establish the Unreal Project. It creates L_Boot, L_MainMenu, L_Boneyard, GM_Boot, and GM_MainMenu; this Adventure opens and edits those existing assets.
Journey 1 — Open on the Splash Screen
Forge 1 — Import the splash artwork
Place the approved splash image in:
SourceAssets/References/ConceptArt
Import it into:
Content/Graves/UI/Art/Textures/Splash
Name the imported texture:
T_Splash_Act1Slate
Open the texture and confirm that it displays correctly. The source file remains outside the Unreal asset tree; the imported texture is the version Unreal uses.
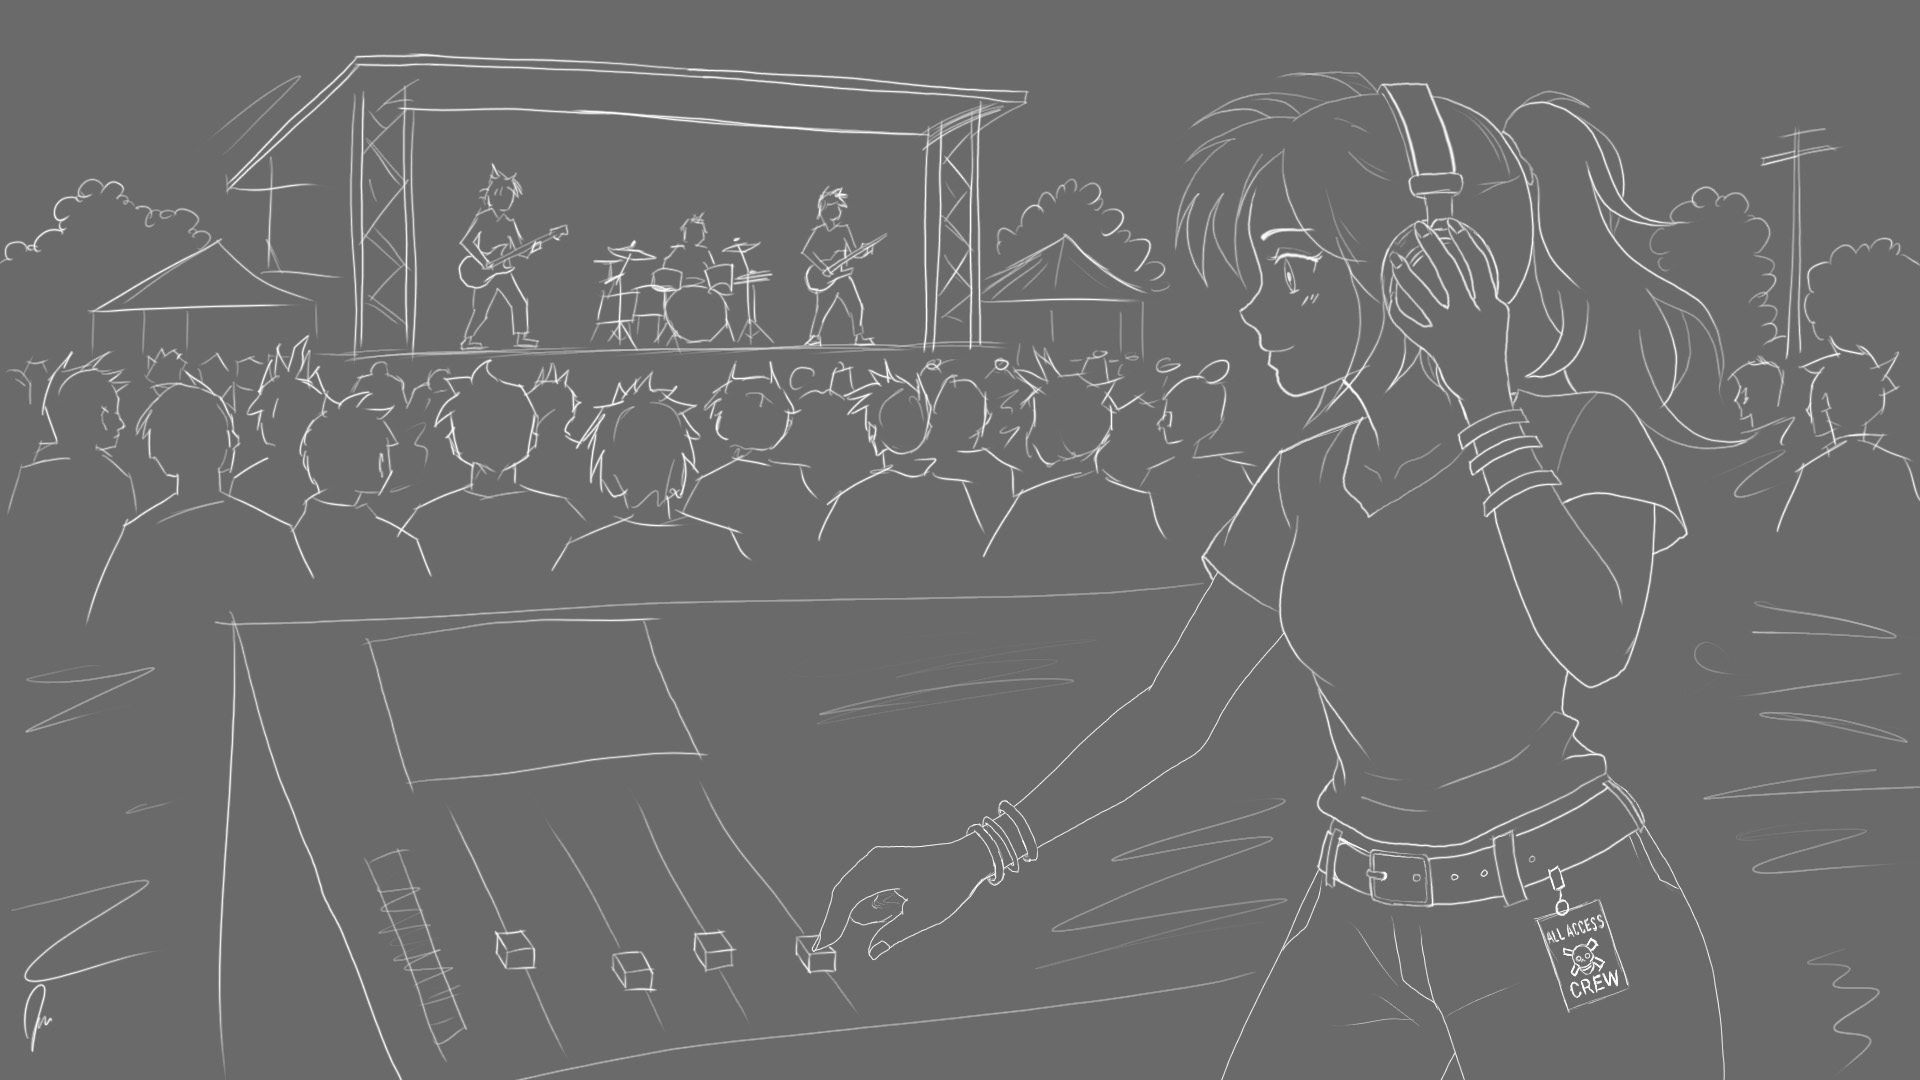
The approved Graves splash-screen concept: Piper works the mix from the crowd while the live performance carries the player into the game.
Forge 2 — Build WBP_Splash
In Content/Graves/UI/Screens/Splash, create a Widget Blueprint named WBP_Splash.
Build this hierarchy:
Canvas Panel
└── Border
    └── Scale Box
        └── Image
Configure the widgets in order:
- Select Border.
- Use full-screen stretch anchors.
- Set every offset to
0. - Set the brush color to black.
- Let its child fill the available space.
- Select Scale Box.
- Fill the Border horizontally and vertically.
- Set Stretch to
Scale To Fit. - Set Stretch Direction to
Both.
- Select Image.
- Let it fill the Scale Box.
- Set its brush to
T_Splash_Act1Slate. - Set Draw As to
Image. - Use no tiling.
The black Border gives the image a clean background when the player’s aspect ratio does not perfectly match the artwork. The Scale Box preserves the art instead of stretching it out of proportion.
Trial — Preview the splash
- The image remains proportional when the preview size changes.
- Empty space appears black rather than transparent.
- The image does not tile.
- The widget fills the screen.
Forge 3 — Let GM_Boot carry the player forward
Open GM_Boot. First place Get Player Controller with Player Index 0; this is a pure getter with no white execution pins. Reuse its return value wherever the route needs the Player Controller.
Build the white execution route from Event BeginPlay:
Event BeginPlay
→ Create Widget
    Class: WBP_Splash
→ Add to Viewport
→ Set Show Mouse Cursor
    Show Mouse Cursor: false
→ Delay
    Duration: 5.0
→ Open Level (by Object Reference)
    Level: L_MainMenu
Add the data wires separately:
Get Player Controller.Return Value
├──→ Create Widget.Owning Player
└──→ Set Show Mouse Cursor.Target

Create Widget.Return Value
└──→ Add to Viewport.Target
Place the nodes inside a comment titled:
Show Splash and Open Main Menu
Compile and save GM_Boot.

The complete GM_Boot route creates the splash, waits, and opens the menu Level.
Discoveries
- BeginPlay fires when the GameMode begins running in its Level.
- Create Widget creates an instance; it does not display that instance by itself.
- Add to Viewport makes the created widget visible.
- Delay pauses this execution route without freezing the entire game.
- Open Level by Object Reference avoids a hand-typed Level name and the spelling errors that come with it.
Trial — Follow the opening route
- Open
L_Boot. - Use the regular Selected Viewport Play mode.
- Confirm that the splash appears immediately.
- Confirm that the mouse cursor is hidden.
- Wait about five seconds.
- Confirm that
L_MainMenuopens automatically.
If Play begins somewhere else, stop and check which Level is open. The Play button starts the current editor Level; it does not force the project’s default route.
Journey 2 — Build the Main Menu
Forge 4 — Import the menu artwork
Place the approved main-menu image in the source-art collection, then import it into:
Content/Graves/UI/Art/Textures/MainMenu
Name the texture:
T_MainMenu_BASE
Open the texture once and confirm that the image is intact. Save it before opening the Widget Designer.
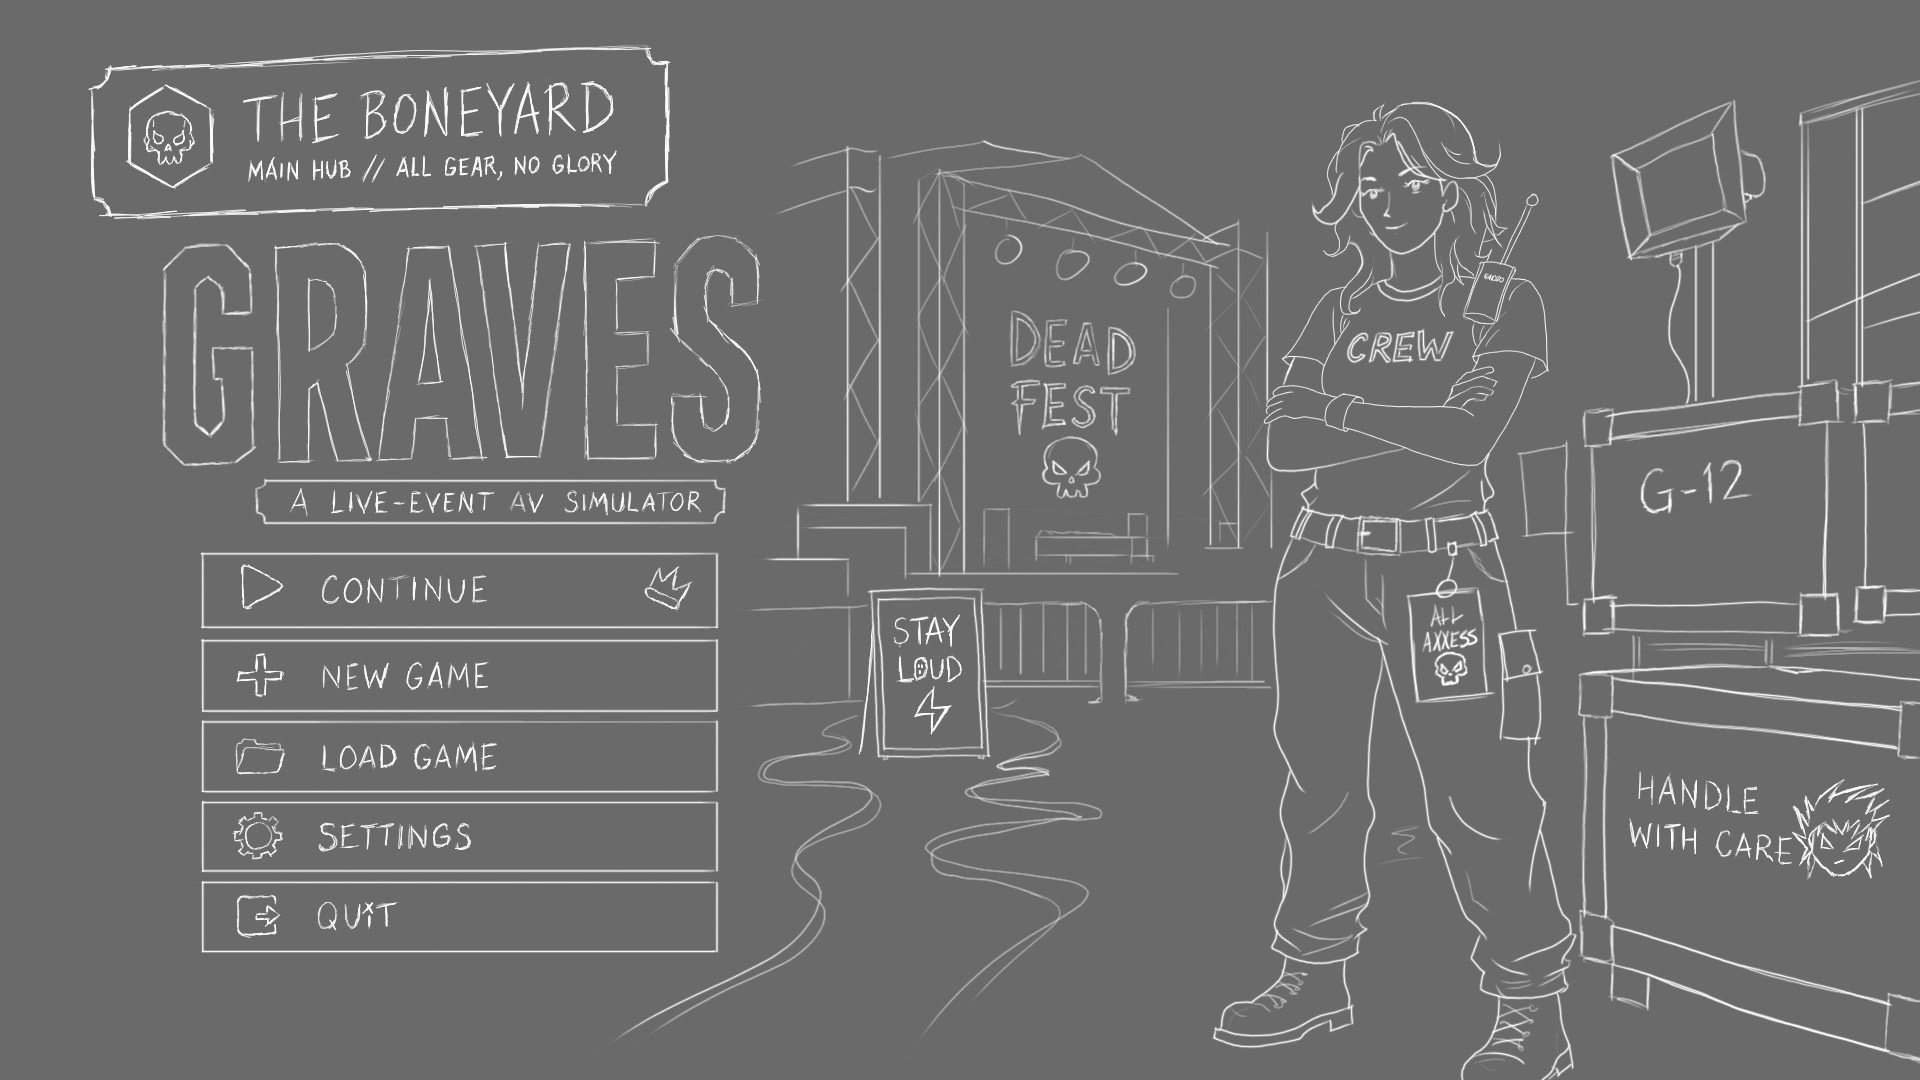
The approved main-menu concept places all five menu rows on the left and preserves a clear 1920×1080 surface for the invisible controls.
Forge 5 — Build the menu as artwork plus controls
Create WBP_MainMenu in:
Content/Graves/UI/Screens/MainMenu
The menu needs a black background and a scaled 1920×1080 design surface. Build this hierarchy:
Canvas Panel
├── Border
└── Scale Box
    └── Size Box
        └── Overlay
            ├── Image
            └── Canvas Panel
                ├── Btn_Continue
                ├── Btn_NewGame
                ├── Btn_LoadGame
                ├── Btn_Settings
                └── Btn_Quit
The Border and Scale Box are siblings under the root Canvas Panel. Inside the Overlay, the Image comes first and the inner Canvas Panel comes second. Overlay children draw in order, so this places the invisible buttons above the artwork.
Configure the background:
- Border
- Full-screen stretch anchors.
- Offsets
0. - Black brush color.
- Visibility:
Not Hit-Testable (Self Only).
- Scale Box
- Full-screen stretch anchors.
- Offsets
0. - Stretch:
Scale To Fit. - Stretch Direction:
Both.
- Size Box
- Horizontal and vertical alignment: centered.
- Width Override:
1920. - Height Override:
1080.
- Overlay
- Fill the Size Box.
- Image
- Brush:
T_MainMenu_BASE. - Draw As:
Image. - Tiling: none.
- Visibility:
Not Hit-Testable (Self Only).
- Brush:
- Inner Canvas Panel
- Fill the Overlay.
- Visibility:
Not Hit-Testable (Self Only).
The parent Canvas may ignore its own hit testing while still allowing its child Buttons to receive clicks. Each Button itself must remain Visible.
Forge 6 — Align the invisible buttons
Place the five Buttons over the five printed menu rows in the image. Name them exactly:
| Button | Intended action |
|---|---|
Btn_Continue | Reserved |
Btn_NewGame | Open the Boneyard |
Btn_LoadGame | Reserved |
Btn_Settings | Reserved |
Btn_Quit | Leave the game |
Use upper-left anchors for the Buttons inside the 1920×1080 Canvas. Temporarily set each Button’s Render Opacity to roughly 0.3 so its footprint is visible over the artwork. Adjust position and size until each Button covers its printed row cleanly, without overlapping a neighbor.
When alignment is complete:
- Return each Button’s Render Opacity to
0.0. - Leave Visibility set to
Visible. - Enable
Btn_NewGameandBtn_Quit. - Disable the three unfinished Buttons.
Opacity controls appearance. Visibility and enabled state control whether the Button can participate. An invisible Button with Visible visibility can still be clicked; a Button set to Not Hit-Testable cannot.
Trial — Inspect the interaction layer
Temporarily restore the Buttons to partial opacity and confirm:
- Every Button covers one printed menu row.
- No Button overlaps the row above or below it.
-
Btn_NewGameandBtn_Quitare enabled. - The remaining three Buttons are disabled.
Return opacity to 0.0 before continuing.
Forge 7 — Create and focus the menu
Open GM_MainMenu. Place one Get Player Controller node with Player Index 0, then build this white execution route:
Event BeginPlay
→ Create Widget
    Class: WBP_MainMenu
→ Add to Viewport
→ Set Show Mouse Cursor
    Show Mouse Cursor: true
→ Set Input Mode UI Only
Wire the data pins:
Get Player Controller.Return Value
├──→ Create Widget.Owning Player
├──→ Set Show Mouse Cursor.Target
└──→ Set Input Mode UI Only.Player Controller

Create Widget.Return Value
├──→ Add to Viewport.Target
└──→ Set Input Mode UI Only.In Widget to Focus
Place the complete route in a comment titled:
Create and Focus Main Menu
Compile and save.
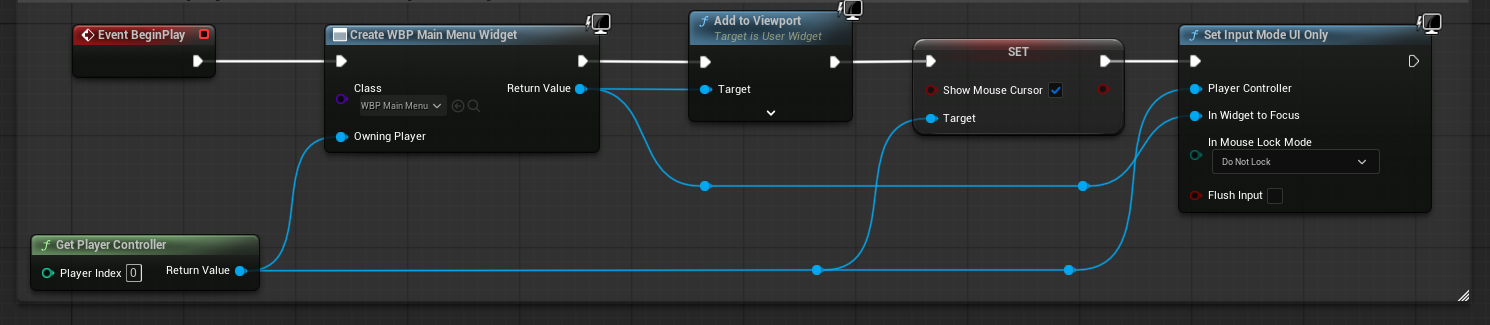
The menu is created, displayed, given a visible cursor, and focused for UI input.
The focus connection matters. Showing a widget and allowing UI input are separate jobs. The Player Controller must be placed in UI-only mode, and the menu instance should receive focus.
Trial — Arrive at a usable menu
- Open
L_MainMenuand Play. - Confirm that the menu fills the screen without distorting.
- Confirm that the cursor is visible.
- Move the cursor over
Btn_NewGameandBtn_Quit. - Confirm that the disabled rows do not behave like finished options.
Journey 3 — Make the Menu Lead Somewhere
Forge 8 — Wire New Game
Open the Graph in WBP_MainMenu. Select Btn_NewGame in the Designer and add its OnClicked event.
Connect:
Btn_NewGame — OnClicked
→ Open Level (by Object Reference)
    Level: L_Boneyard
Place the nodes inside a comment titled:
Start New Game
Compile and save the widget.
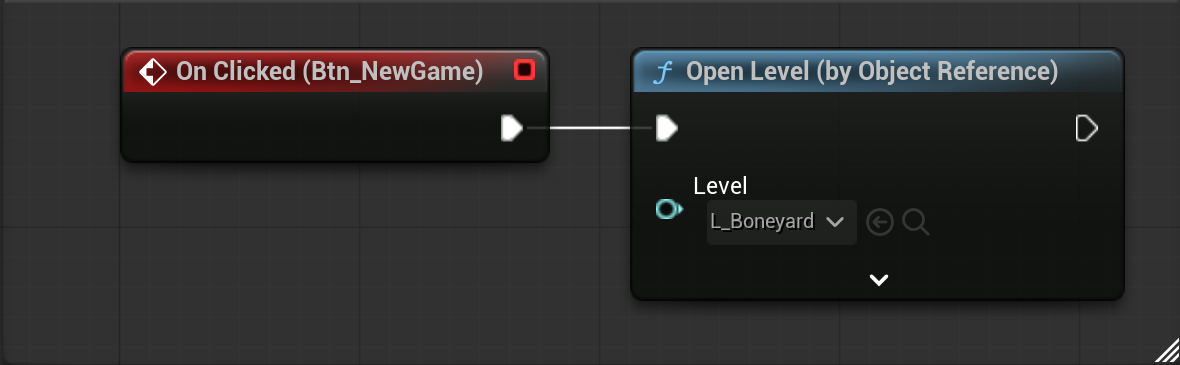
Btn_NewGame opens L_Boneyard directly.
Forge 9 — Wire Quit
Add the OnClicked event for Btn_Quit, then connect:
Btn_Quit — OnClicked
→ Quit Game
    Specific Player: Get Owning Player
    Quit Preference: Quit
Place the nodes inside a comment titled:
Quit Game
Compile and save.
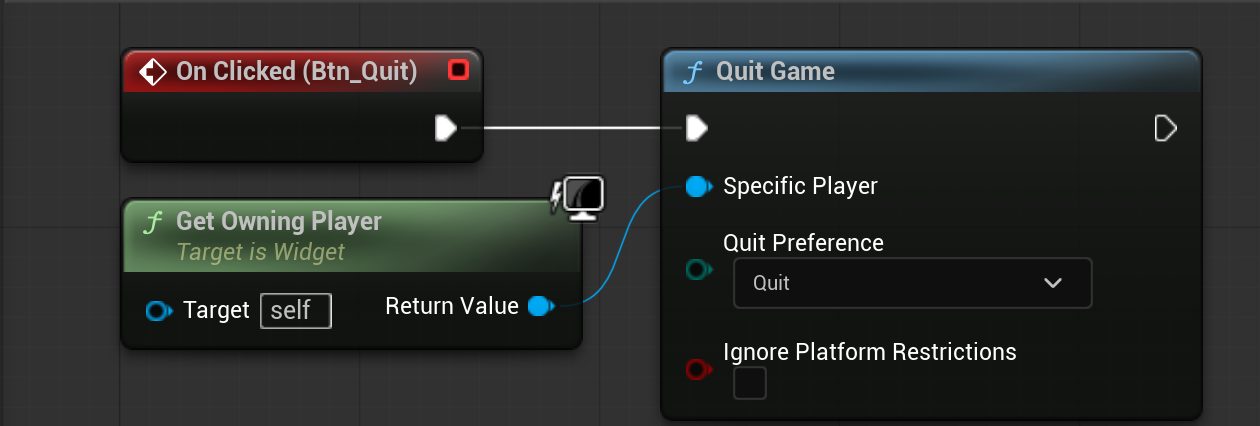
Btn_Quit sends the request through the Player Controller that owns the menu.
Get Owning Player returns the Player Controller assigned when GM_MainMenu created the widget. That keeps the action attached to the controller that actually owns this menu.
Trial — Run the complete startup journey
Begin fresh from L_Boot.
- Press Play.
- Confirm the splash appears with no mouse cursor.
- Wait for the automatic transition.
- Confirm the main menu appears and the cursor returns.
- Click New Game.
- Confirm that
L_Boneyardopens. - Stop Play, begin again from
L_Boot, return to the menu, and visually inspect Quit before using it.
The New Game route is complete only when it works from the opening Level—not merely when L_MainMenu is played by itself. Quit is correctly constructed when it compiles and is connected to the owning player; verify its runtime behavior when closing the active Play session is convenient.
The project now has a beginning the player can follow. It is simple, deliberate, and separate from the playable character work that comes next.