The Boneyard can open, but it cannot yet be inhabited. This Adventure gives the player a body, a camera, and a compact Enhanced Input system for walking, looking, jumping, and sprinting.
The work stays intentionally plain. A temporary floor and a few clean inputs reveal more than a decorated Level can. By the end, the entire route—from splash to menu to first-person control—will run in one uninterrupted Play session.
Before you begin, complete Adventure 1 — Establish the Unreal Project and Adventure 2 — Build the Startup and Main Menu. They create the three Levels, GM_Gameplay, and the startup route used here.
Journey 1 — Define the Player’s Inputs
Forge 1 — Create the Input Actions
In Content/Graves/Core/Input/Actions, create these Input Action assets:
| Asset | Value Type | Purpose |
|---|---|---|
IA_Move | Axis2D | Forward/back and left/right movement |
IA_Look | Axis2D | Mouse yaw and pitch |
IA_Jump | Digital | Start and stop a jump |
IA_Sprint | Digital | Enter and leave sprint speed |
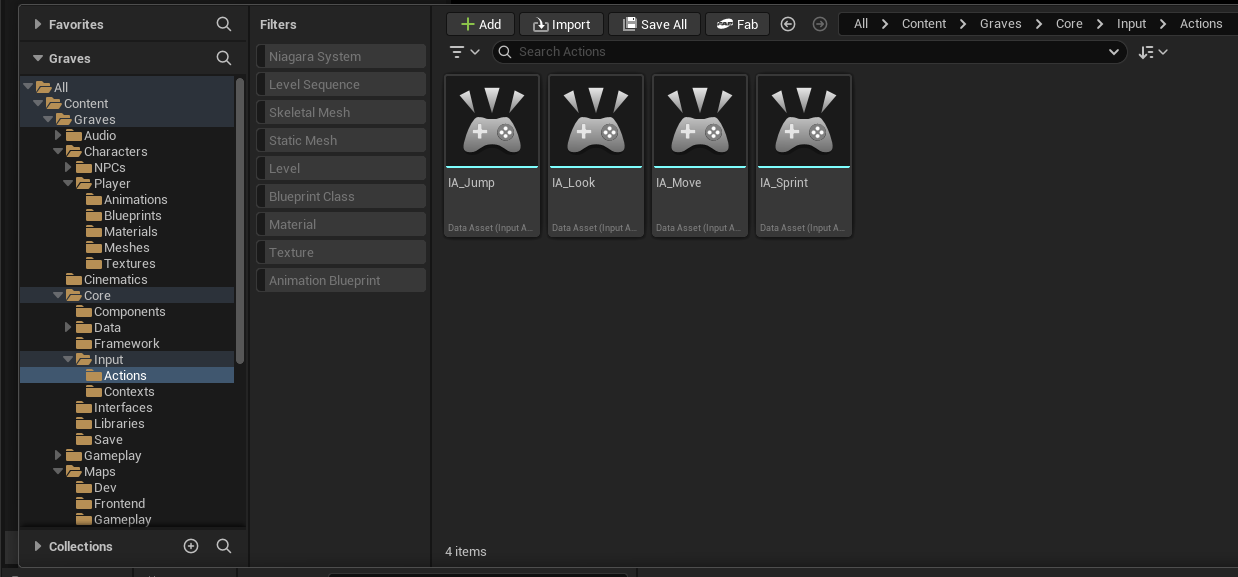
The four saved Input Actions in Core/Input/Actions.
Open every asset and confirm its Value Type. A Digital action behaves like a button. An Axis2D action carries an X and Y value together.
Compile is not required for Input Actions, but each asset must be saved before it is used in a mapping context.
Forge 2 — Build IMC_Player
In Content/Graves/Core/Input/Contexts, create an Input Mapping Context named IMC_Player.
Add these mappings:
| Key | Action | Modifiers |
|---|---|---|
W | IA_Move | Swizzle Input Axis Values: YXZ |
S | IA_Move | Negate, then Swizzle Input Axis Values: YXZ |
A | IA_Move | Negate |
D | IA_Move | None |
| Mouse XY 2D-Axis | IA_Look | None |
| Space Bar | IA_Jump | None |
| Left Shift | IA_Sprint | None |
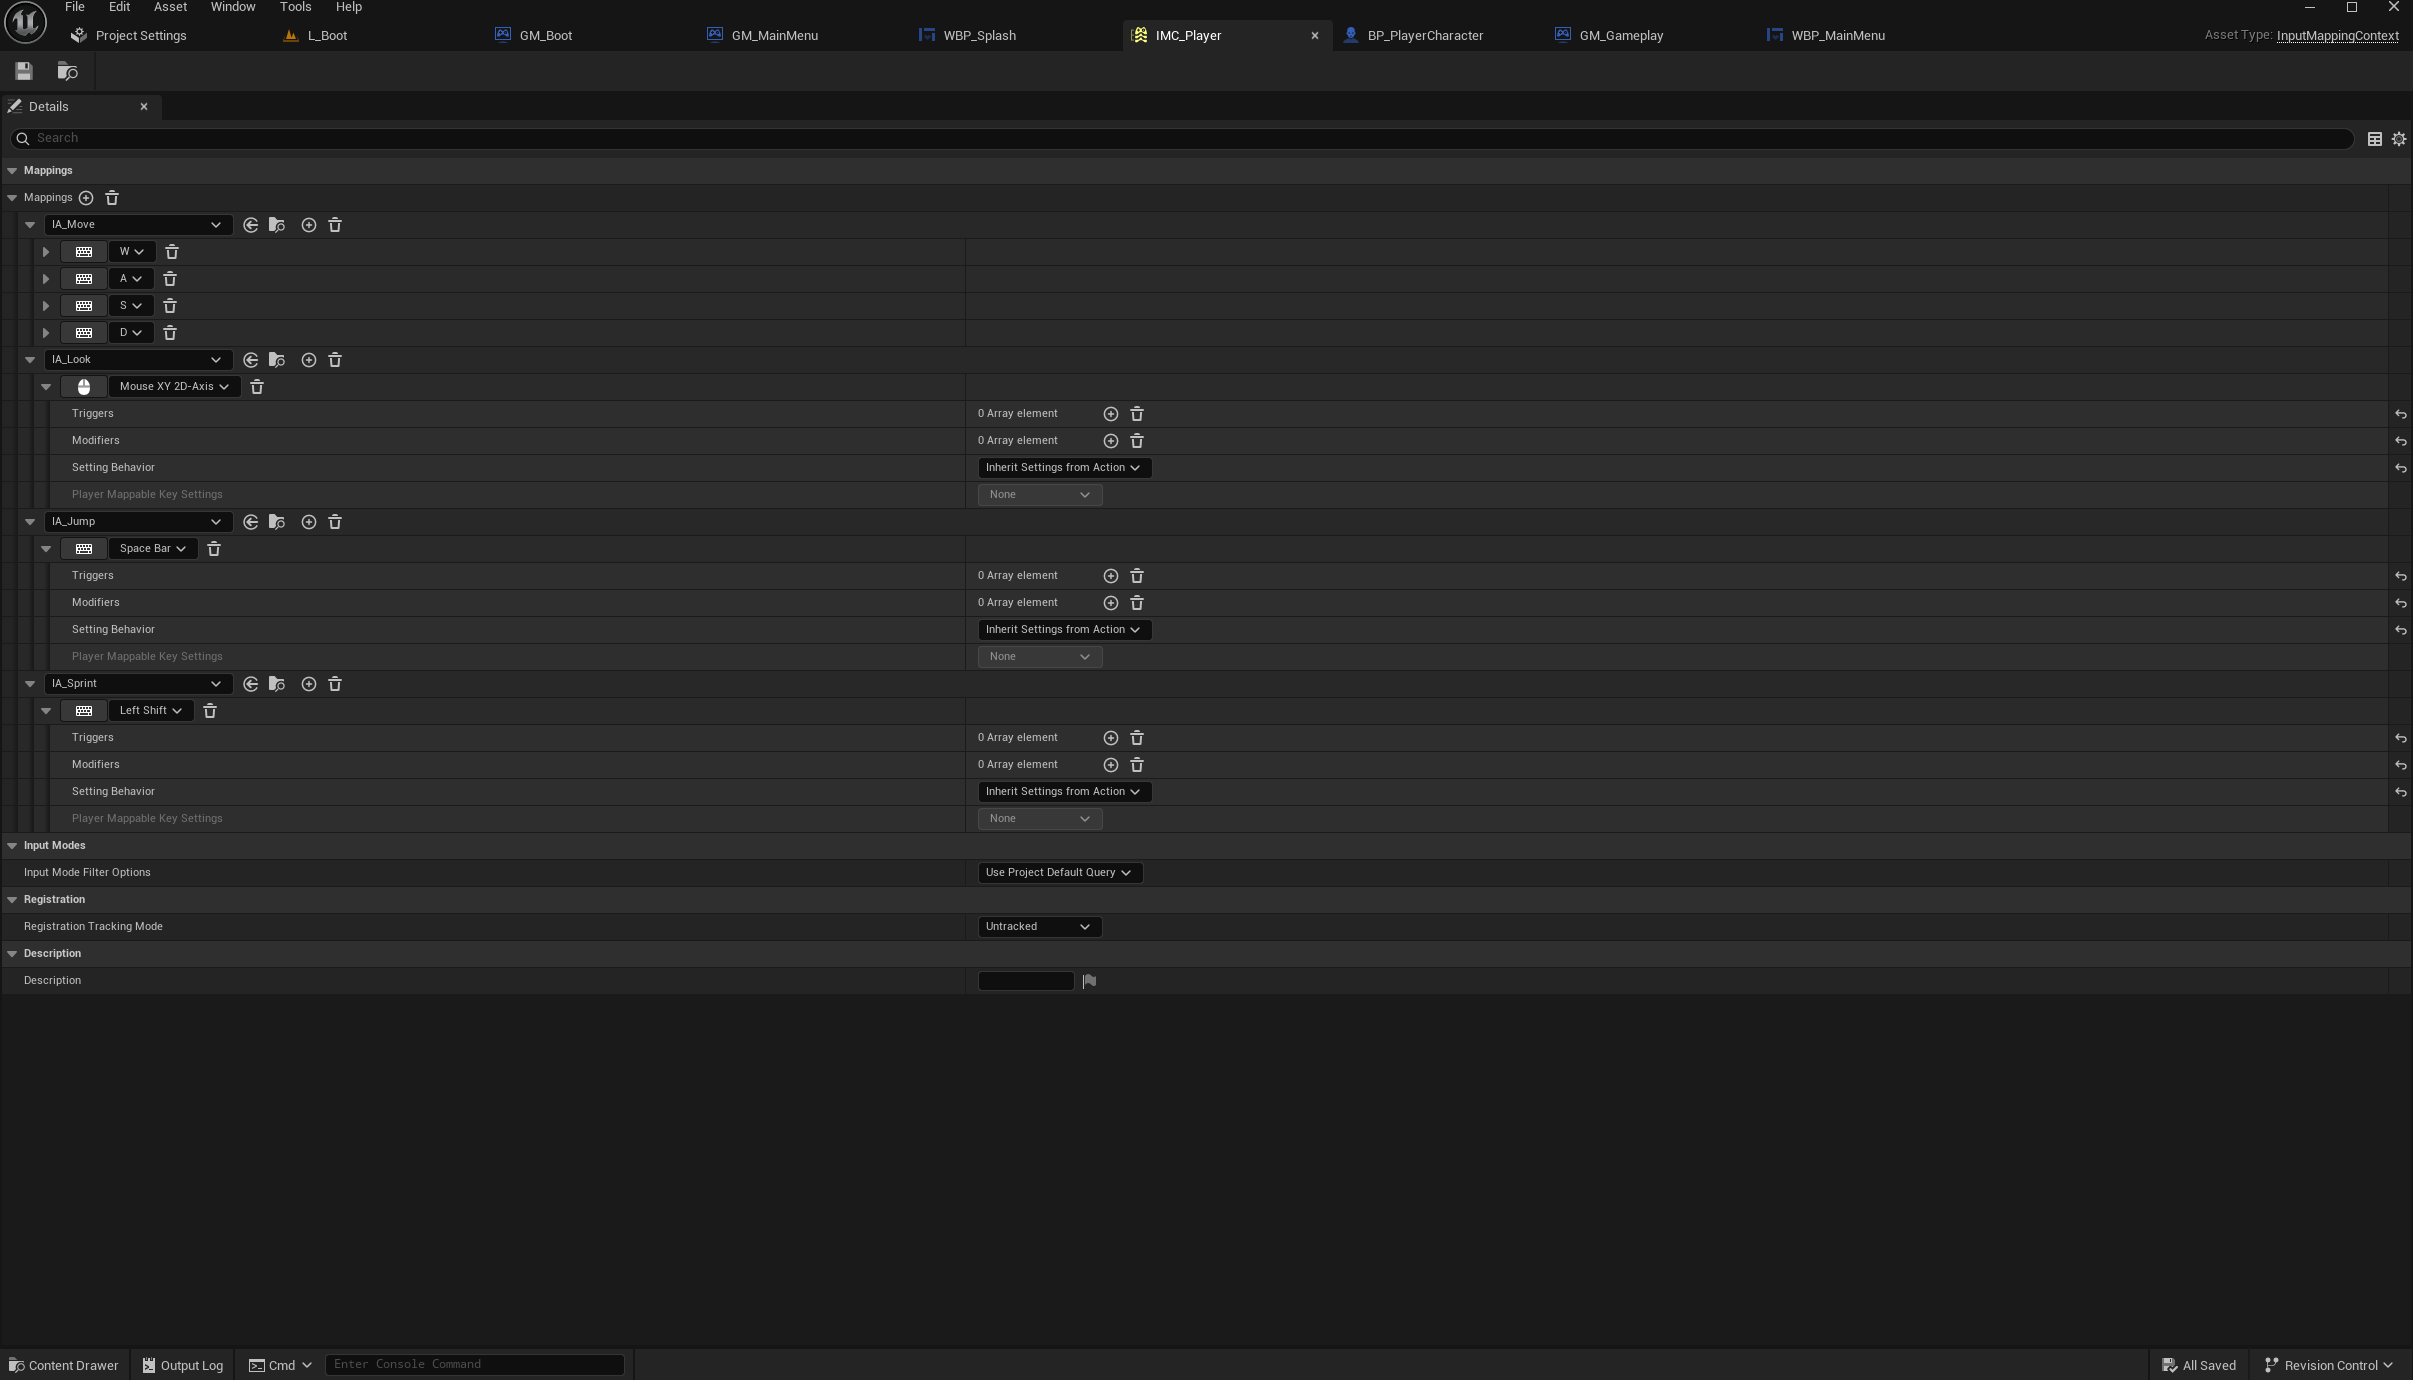
IMC_Player gathers the physical keys and mouse axes in one mapping asset.
IA_Move treats X as left/right and Y as forward/back. A keyboard key begins as a one-dimensional value, so the W and S mappings use Swizzle Input Axis Values: YXZ to move that value onto Y. Negate turns the positive value from S or A into the opposite direction.
Save IMC_Player.
Discoveries
- An Input Action describes meaning: Move, Look, Jump, Sprint.
- An Input Mapping Context connects physical controls to those actions.
- Modifiers reshape the input value before the Action event receives it.
- A mapping context does nothing until it is added to the local player’s Enhanced Input subsystem.
Trial — Inspect the mappings
-
IA_MoveandIA_Lookare Axis2D. -
IA_JumpandIA_Sprintare Digital. - W and S affect Y.
- A and D affect X.
- S and A are negated.
- Mouse, Space Bar, and Left Shift each appear once.
Journey 2 — Build the First-Person Character
Forge 3 — Create BP_PlayerCharacter
In Content/Graves/Characters/Player/Blueprints, create a Blueprint Class based on Character and name it:
BP_PlayerCharacter
Add a Camera component as a child of the Capsule Component. Name it:
Camera_FirstPerson
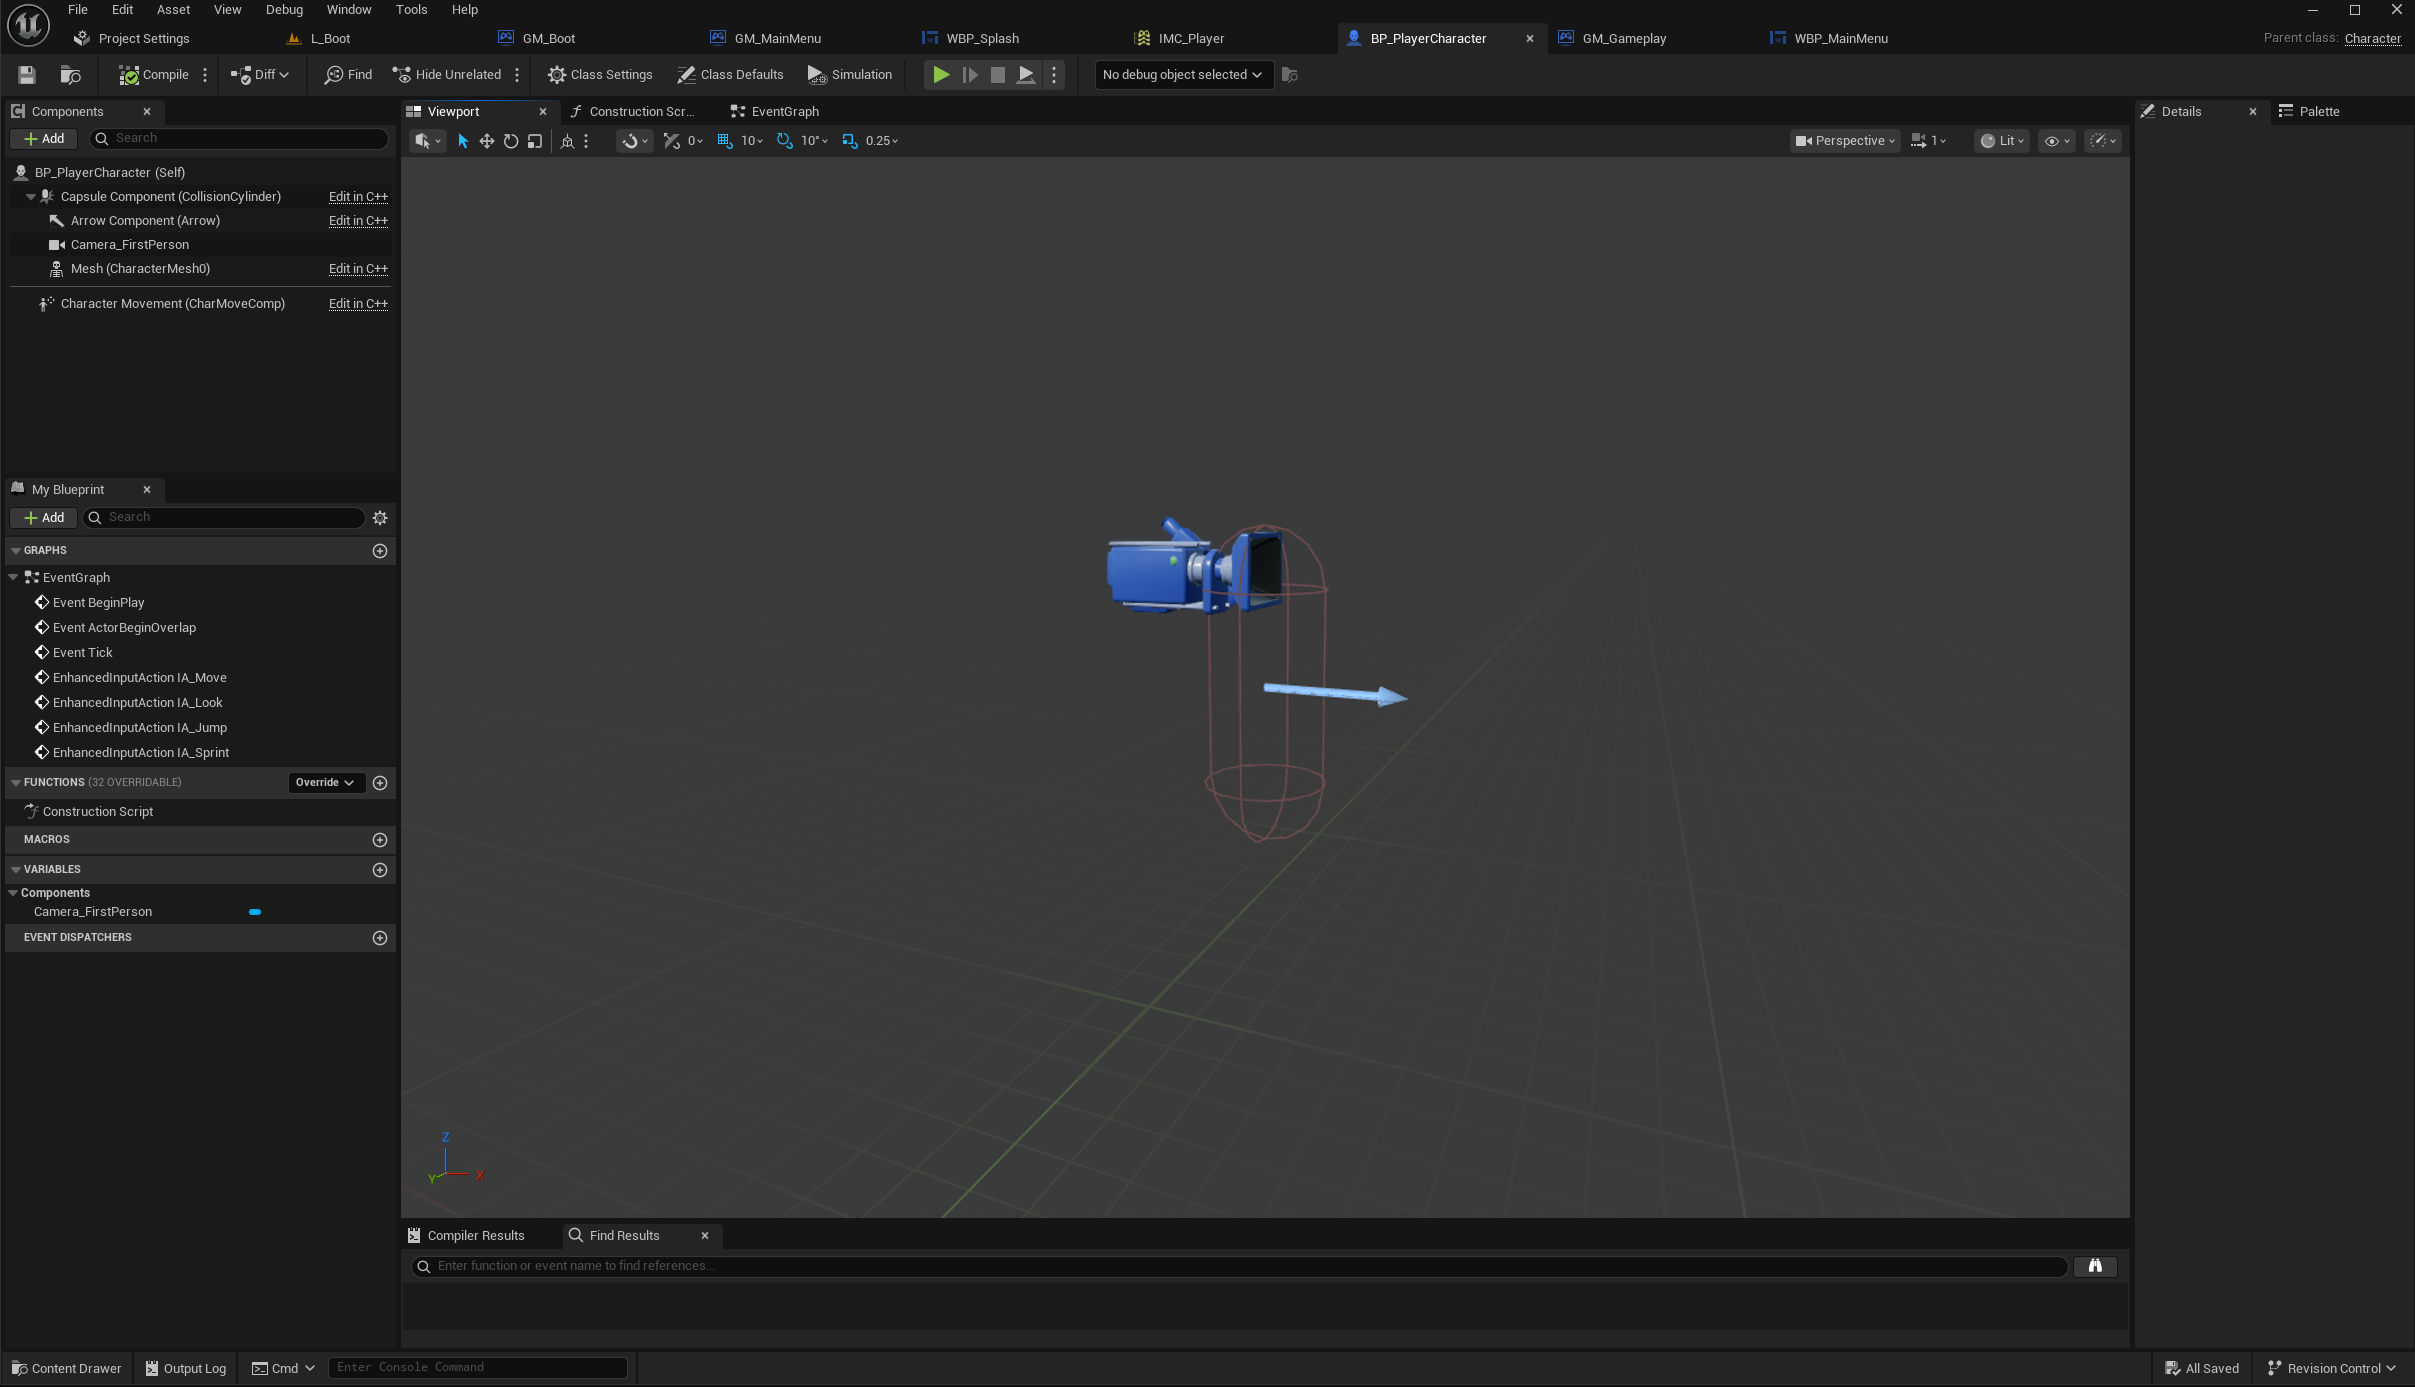
The first-person Camera is a child of the Character’s Capsule Component.
Configure the camera:
| Setting | Value |
|---|---|
| Relative Location Z | Approximately 64 |
| Field of View | 90 |
| Use Pawn Control Rotation | Enabled |
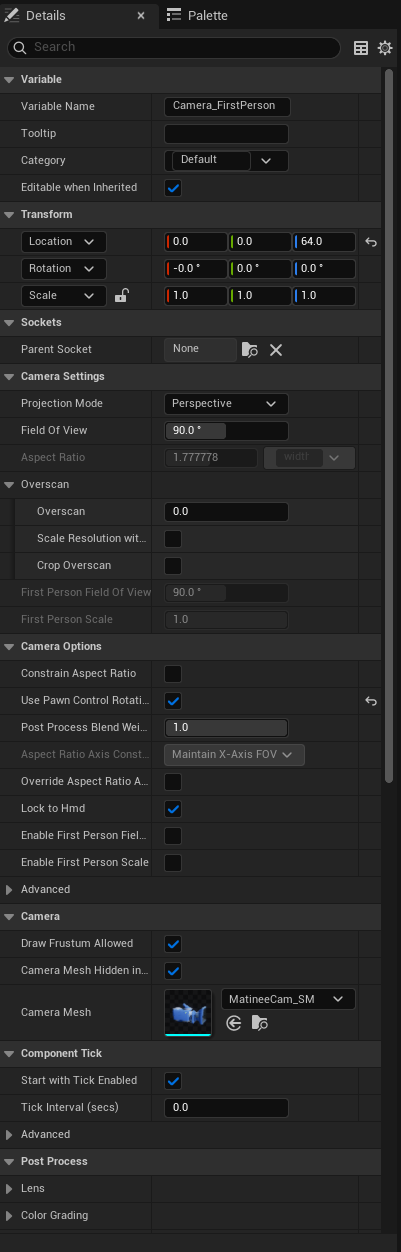
The Camera settings establish eye height, field of view, and controller-driven rotation.
The exact Z position can be refined when the player has a visible body. For this foundation, place the camera near a natural standing eye height and keep its relative rotation neutral.
In the character’s Class Defaults, set:
| Setting | Value |
|---|---|
| Use Controller Rotation Yaw | Enabled |
| Use Controller Rotation Pitch | Disabled |
| Use Controller Rotation Roll | Disabled |
Select Character Movement and set:
| Setting | Value |
|---|---|
| Orient Rotation to Movement | Disabled |
| Max Walk Speed | 400 |
| Jump Z Velocity | 500 |
| Gravity Scale | 1 |
Compile and save.
The controller owns the viewing direction. Enabling controller yaw on the Character makes left/right view rotation turn the character as well. Orient Rotation to Movement remains off because this is not a third-person character that should turn toward whichever way it moves.
Forge 4 — Let the gameplay GameMode spawn the character
Open GM_Gameplay and set:
Default Pawn Class = BP_PlayerCharacter
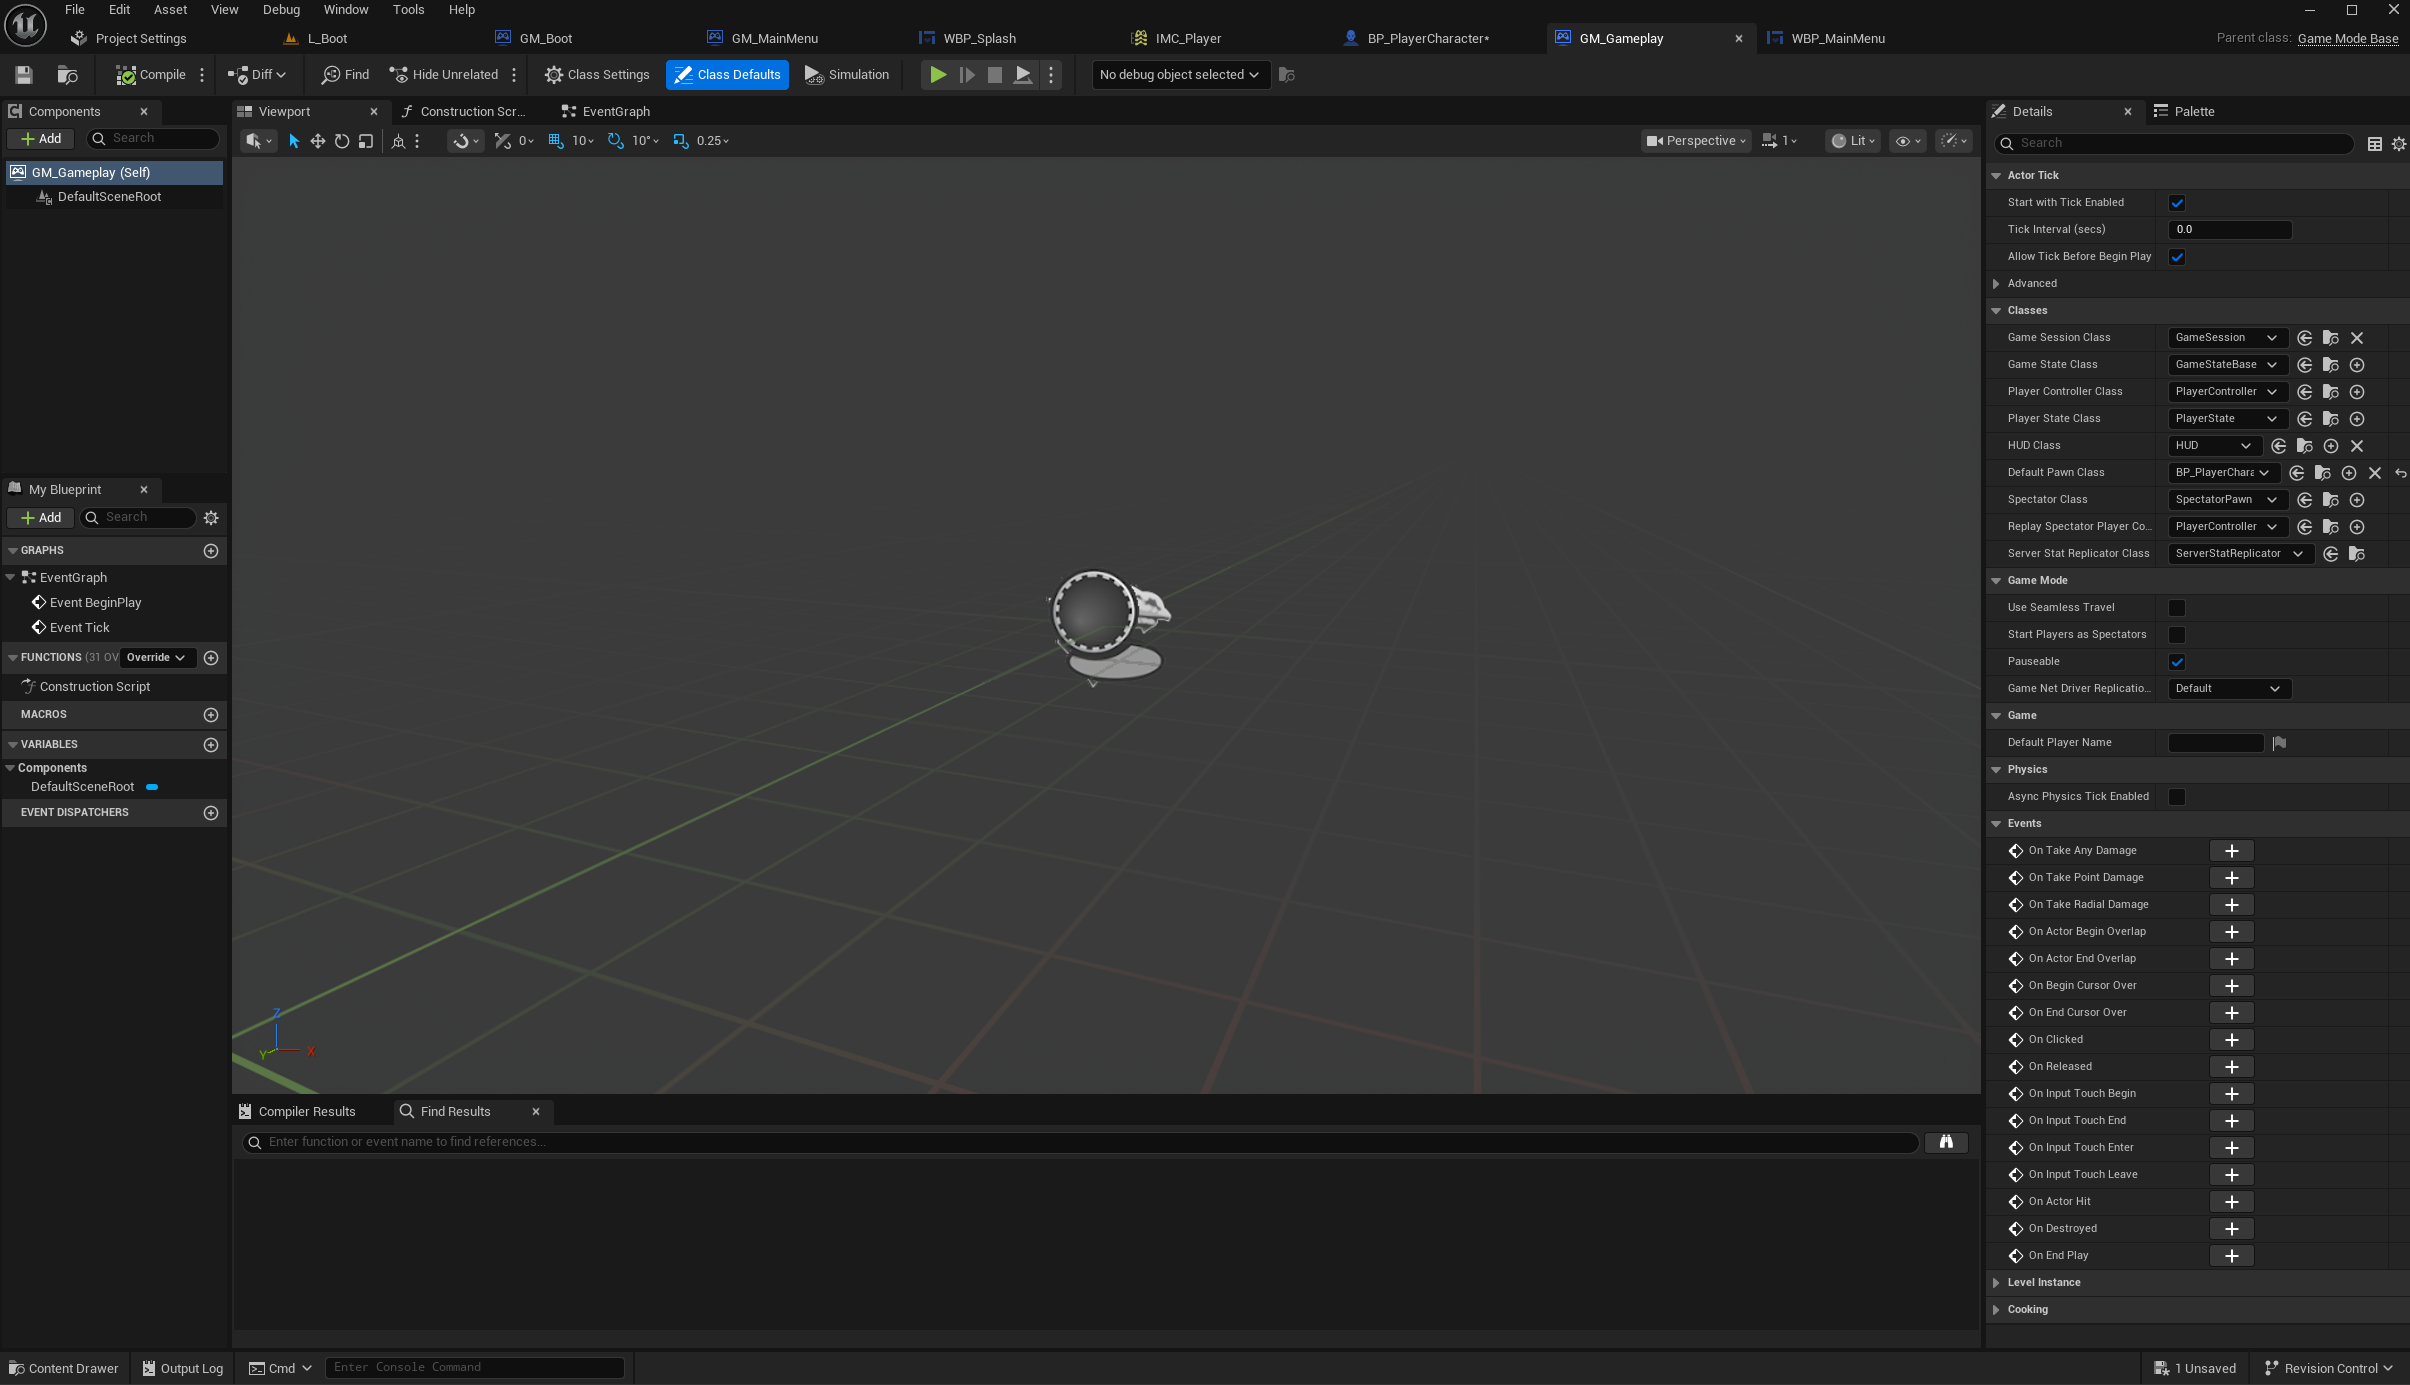
GM_Gameplay now knows which Pawn to spawn for the player.
Compile and save.
Open L_Boneyard and confirm that World Settings > GameMode Override is still GM_Gameplay.
For the first movement test, the Level only needs:
- A large Cube scaled into a floor.
- A
PlayerStartplaced safely above it. - A Directional Light if the floor is difficult to read.
Set the temporary floor’s Collision Preset to BlockAll. Keep the PlayerStart capsule clear of the floor and any nearby geometry.
Trial — Spawn the correct Pawn
- Open
L_Boneyard. - Press Play.
- Confirm that the view begins at the PlayerStart rather than at a free editor camera.
- Stop Play.
At this point the Pawn may not move. The test only proves that GM_Gameplay creates BP_PlayerCharacter.
Journey 3 — Connect the Character to Enhanced Input
Forge 5 — Add the mapping context at BeginPlay
Open the Event Graph in BP_PlayerCharacter.
From Event BeginPlay, add the mapping context. Get Player Controller and Get Enhanced Input Local Player Subsystem are data getters, so they do not sit in the white execution route.
Event BeginPlay
→ Add Mapping Context
    Mapping Context: IMC_Player
    Priority: 0
Continue the execution route:
→ Set Show Mouse Cursor
    Show Mouse Cursor: false
→ Set Input Mode Game Only
    Player Controller: the same Player Controller
Add the data wires:
Get Player Controller (Player Index 0).Return Value
├──→ Get Enhanced Input Local Player Subsystem.Player Controller
├──→ Set Show Mouse Cursor.Target
└──→ Set Input Mode Game Only.Player Controller

Get Enhanced Input Local Player Subsystem.Return Value
└──→ Add Mapping Context.Target
Place the complete setup inside a comment titled:
Player Input Setup
Compile and save.
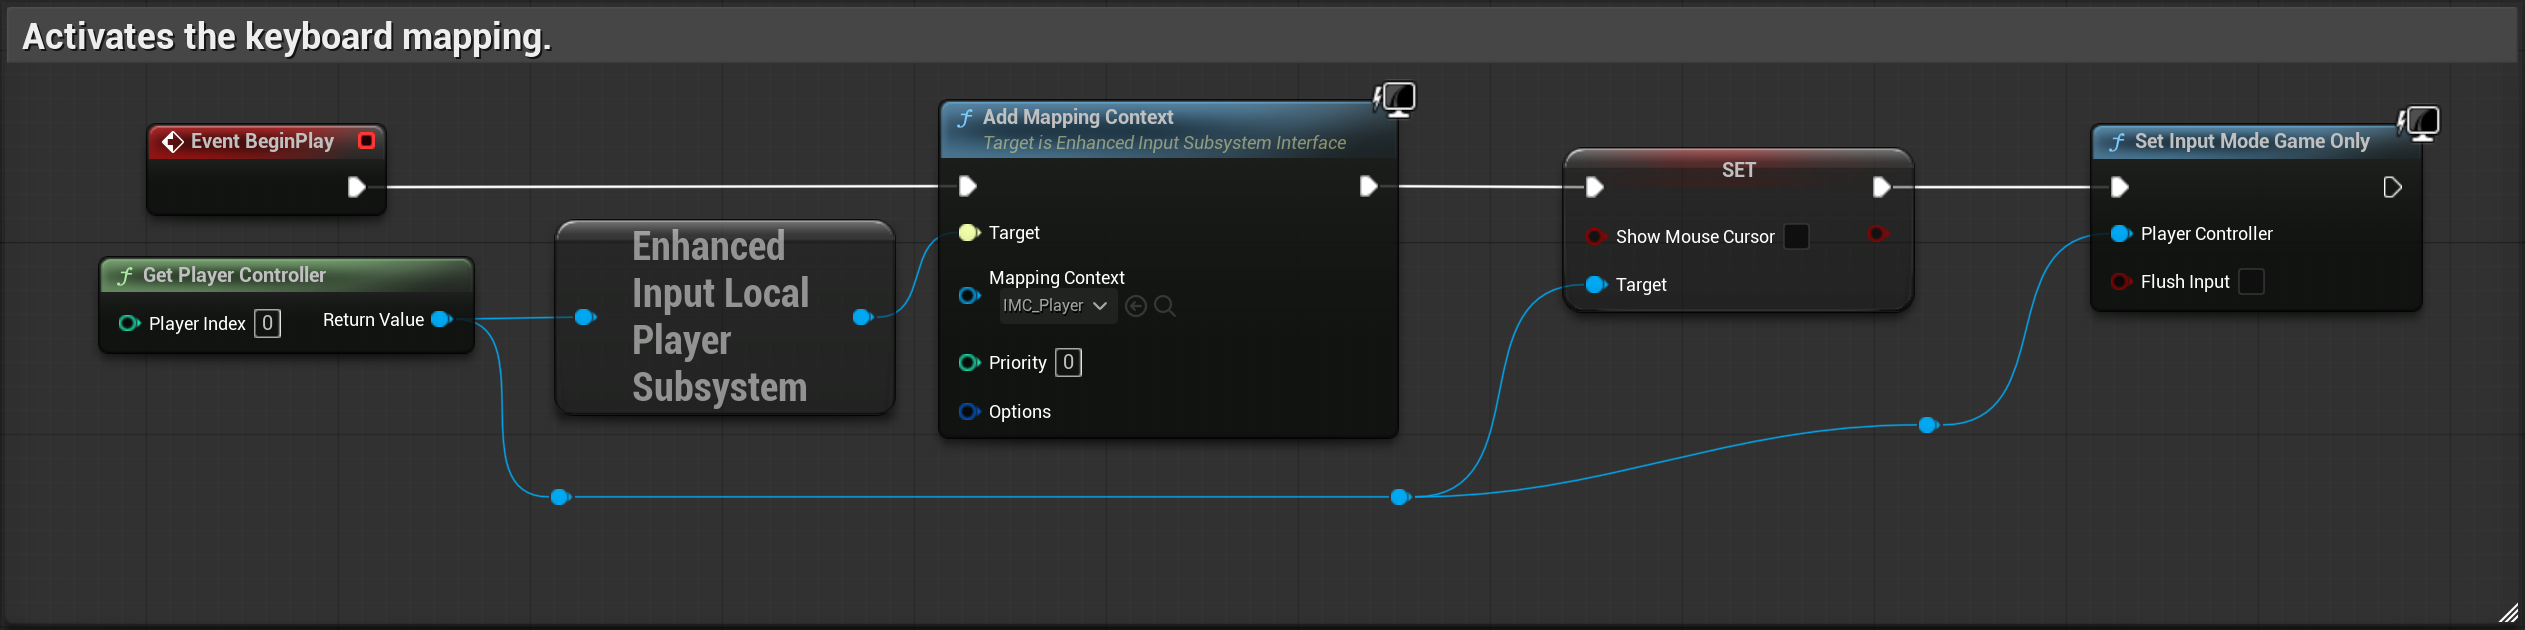
BeginPlay adds IMC_Player, hides the cursor, and returns input to the game.
The mapping belongs to the local player subsystem, while cursor visibility and input mode belong to the Player Controller. Reuse the same controller reference rather than scattering unrelated controller lookups through the graph.
Trial — Capture game input
Play L_Boneyard.
- The cursor disappears.
- Mouse movement is captured by the Play session.
- Pressing Shift+F1 releases the mouse when you need the editor.
Shift+F1 is an editor escape route, not an input fix. If the game never captured the mouse, inspect the BeginPlay route and the active Pawn.
Forge 6 — Build WASD movement
Add the IA_Move event to the Event Graph. Use its Triggered execution output and its two-dimensional Action Value.
Build two movement calls in sequence:
IA_Move — Triggered
→ Add Movement Input
    World Direction: Get Actor Forward Vector
    Scale Value: Action Value Y
→ Add Movement Input
    World Direction: Get Actor Right Vector
    Scale Value: Action Value X
Place the route inside:
WASD Movement
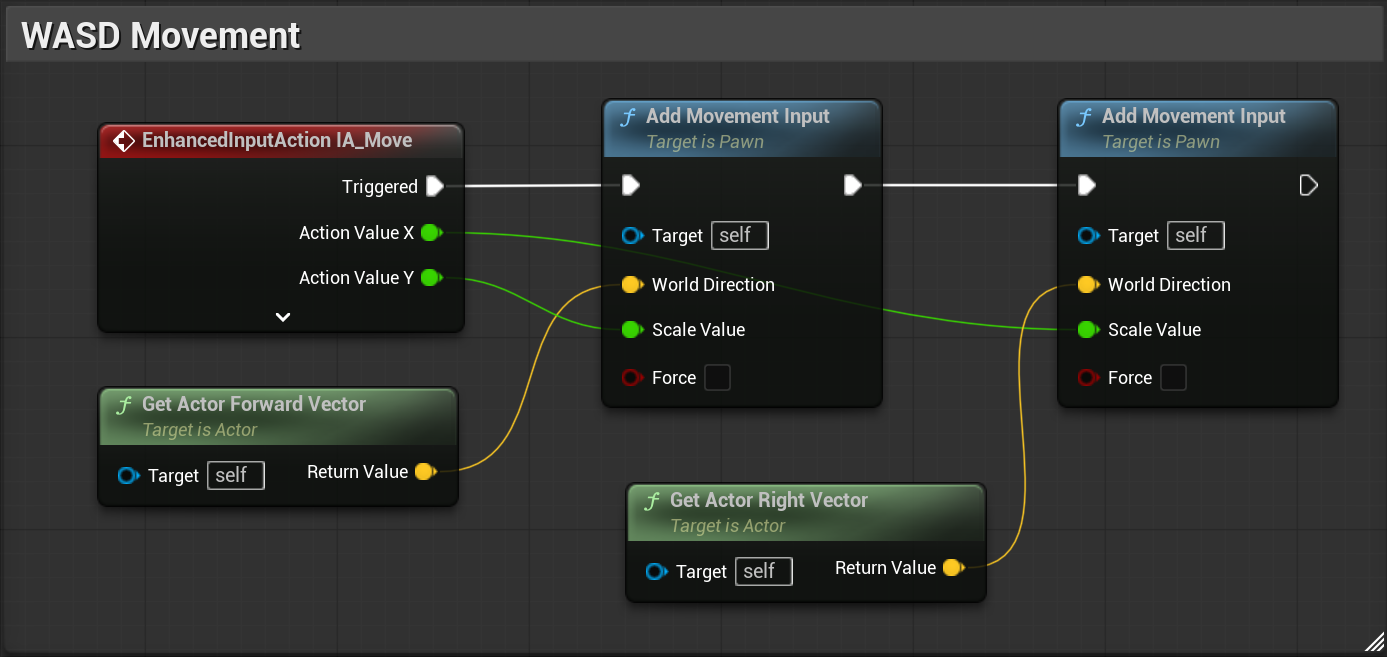
The two movement calls apply the Action Value’s Y and X components along the Character’s forward and right vectors.
The Character’s forward and right vectors follow its yaw. That makes W move in the direction the character faces while A and D remain perpendicular to that direction.
Trial — Walk every direction
Play and test one key at a time:
- W moves forward.
- S moves backward.
- A moves left.
- D moves right.
- Diagonal combinations move diagonally.
- Releasing all keys stops acceleration.
If forward and sideways are exchanged, inspect the W/S swizzle modifiers. If only one direction is reversed, inspect Negate on that key.
Forge 7 — Build mouse look
Add the IA_Look event. From Triggered, connect:
IA_Look — Triggered
→ Add Controller Yaw Input
    Value: Action Value X
→ Add Controller Pitch Input
    Value: Action Value Y × -1.0
Place the nodes inside:
Mouse Look
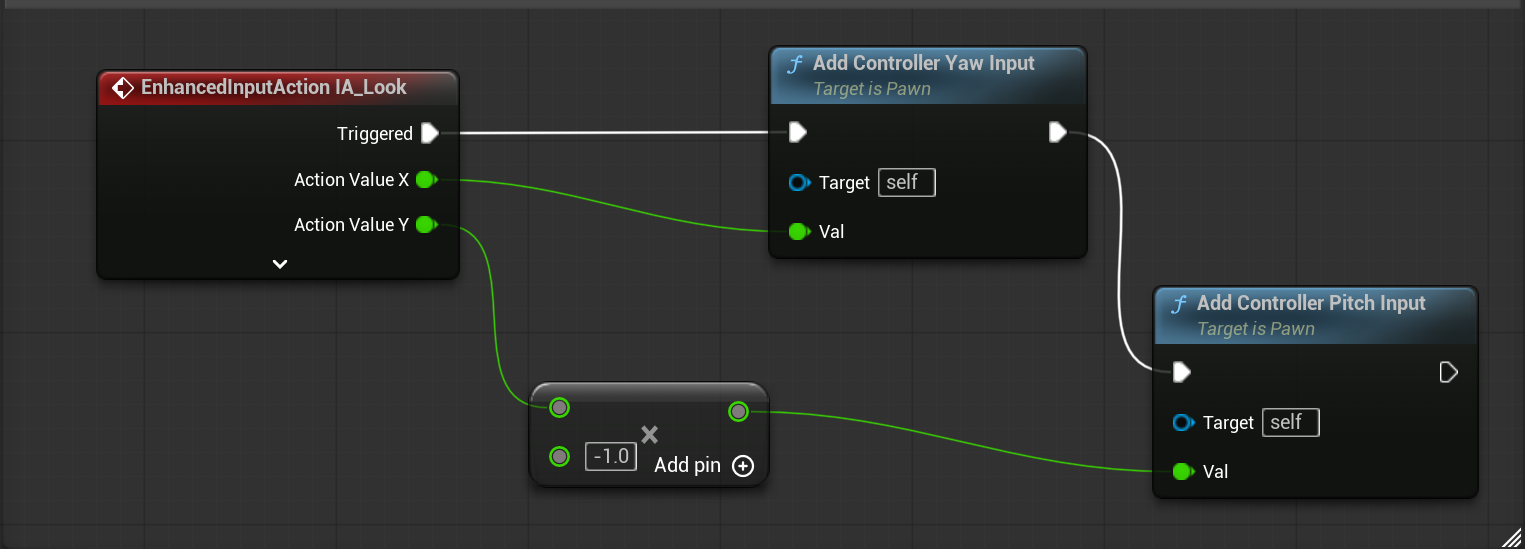
Mouse X drives yaw while the negated Y value drives pitch.
The -1.0 multiplier produces the accepted vertical direction for this project. If you later add an invert-Y setting, that preference should control the sign rather than requiring a second look graph.
Trial — Look without rolling
- Moving the mouse left and right changes yaw.
- Moving the mouse up and down changes pitch in the accepted direction.
- The character does not roll.
- Forward movement follows the new yaw.
Forge 8 — Add jump
Add the IA_Jump event and use two event outputs:
IA_Jump — Started
→ Jump

IA_Jump — Completed
→ Stop Jumping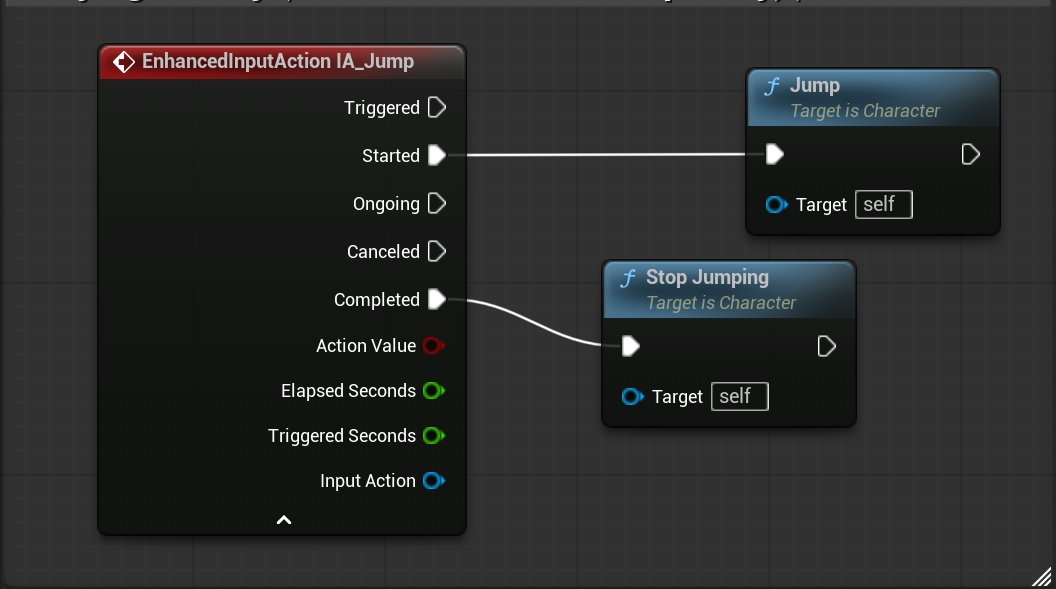
Started begins the jump; Completed releases it.
Compile and save.
Using Started prevents the jump function from being called every frame the key remains down. Completed releases the jump when the button is released.
Trial — Leave and return to the floor
- Space Bar starts one jump.
- The character rises and returns to the floor.
- Holding and releasing Space Bar does not leave the Character in a permanent jump state.
- The floor collision catches the Character.
Forge 9 — Add sprint
Add the IA_Sprint event. Drag the Character Movement component into the graph and set its Max Walk Speed from the two event outputs:
IA_Sprint — Started
→ Set Max Walk Speed
    Target: Character Movement
    Max Walk Speed: 650

IA_Sprint — Completed
→ Set Max Walk Speed
    Target: Character Movement
    Max Walk Speed: 400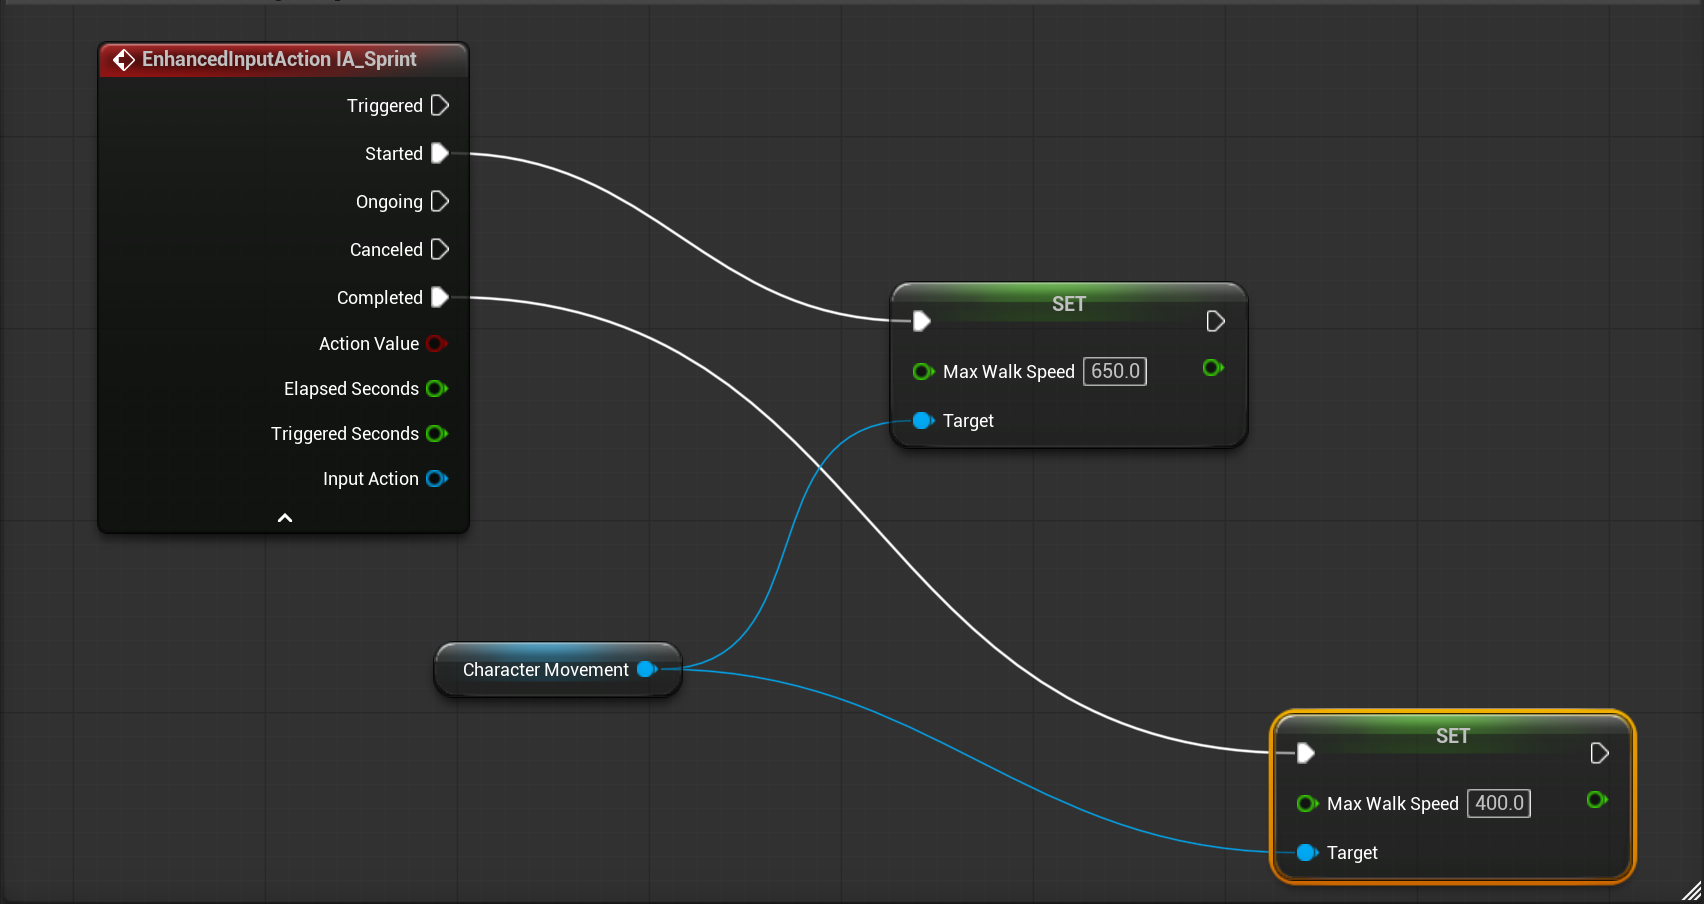
The same Action raises Max Walk Speed on press and restores it on release.
Compile and save.
The Character begins at the walk speed already stored on Character Movement. Pressing Left Shift raises the limit; releasing it restores the same baseline value.
Trial — Compare the two speeds
- Walk a recognizable distance without sprinting.
- Hold Left Shift and cover the same distance.
- Release Left Shift while still moving.
Confirm that movement is plainly faster at 650 and returns to 400 as soon as sprint ends.
Journey 4 — Prove the Whole Route
Forge 10 — Run one uninterrupted session
Save All, open L_Boot, and start Selected Viewport Play. Do not stop between checkpoints.
- Opening
- The splash appears immediately.
- The mouse cursor is hidden.
- Transition
- After roughly five seconds,
L_MainMenuopens. - The cursor becomes visible.
- After roughly five seconds,
- Menu
- Click New Game.
L_Boneyardopens.
- Gameplay capture
- The cursor disappears.
- The game receives keyboard and mouse input.
- Movement
- Test W, S, A, D, and a diagonal.
- Turn, then confirm W follows the new facing direction.
- Abilities
- Jump.
- Walk, sprint, then return to walking.
Final Trial — Diagnose the first broken checkpoint
The Adventure passes when every checkpoint succeeds in order during the same session.
If the route fails, repair the first failed checkpoint before investigating anything downstream:
| Failure | First place to inspect |
|---|---|
| Splash never appears | L_Boot GameMode override and GM_Boot BeginPlay |
| Menu never opens | Delay and Open Level reference in GM_Boot |
| Menu appears without cursor | GM_MainMenu cursor and UI input route |
| New Game does nothing | Btn_NewGame visibility, enabled state, and OnClicked event |
| Boneyard opens without the player | GM_Gameplay Default Pawn and L_Boneyard override |
| Character spawns but receives no input | IMC_Player BeginPlay setup |
| One movement direction is wrong | That key’s mapping modifier |
The player can now travel from the first image on screen to a responsive first-person body. The foundation is deliberately small, but it is complete enough to support a real place.